As I lean against the weathered kitchen counter, I can still see my grandmother in her apron, her gentle hands deftly spreading that luscious cherry filling over a buttery crust. Old-Fashioned Cherry Bars aren’t just a dessert in our family; they’re a celebration, a memory wrapped with warmth and laughter. I remember the rich, tart scent swirling around the room, making the wait unbearable for my eager little taste buds. We’d gather around, each of us sneaking tiny bites of dough when grandma wasn’t looking, knowing that the real treat was still to come.
The first time I made these bars on my own, my heart pounded with anticipation. I longed to capture that same sense of joy she imparted with every square served. Each time I pulled a tray from the oven, the golden edges and bright glimmer of cherry filling took me right back to those sunny afternoons in her Asheville kitchen. That nostalgia motivates my love for cooking, especially when creating these delightful Old-Fashioned Cherry Bars that transform every bite into a cherished moment.
Flavor and Popularity
The Unique Flavor Profile of Old-Fashioned Cherry Bars
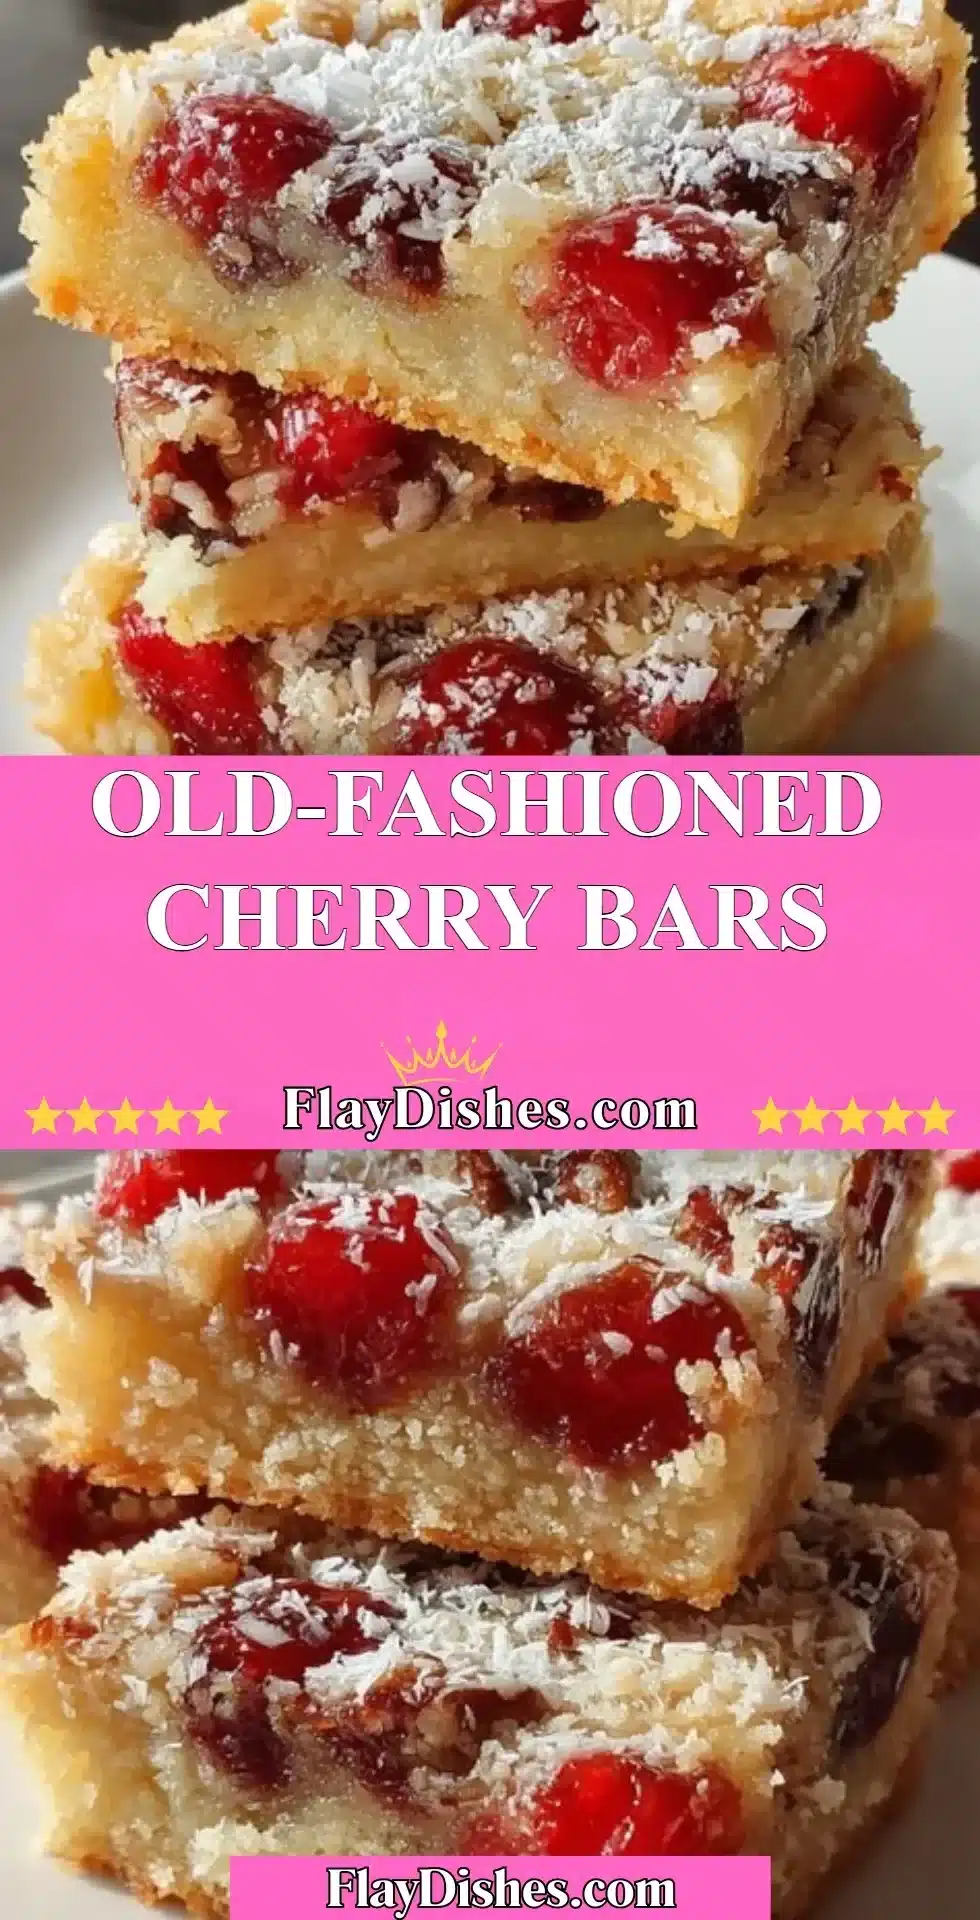
Old-Fashioned Cherry Bars embody a beautifully balanced flavor profile. The bright, tart cherries provide a delightful contrast to the sweet, buttery crust, creating a delightful tension that keeps your taste buds dancing. This is not merely a dessert; it’s an experience. The bar’s rich vanilla undertones deepen the cherry’s natural sweetness, making each bite incredibly satisfying. These flavors marry seamlessly, producing an irresistible treat that delights, regardless of the occasion.
Moreover, there’s a nostalgic, homey quality about Old-Fashioned Cherry Bars that transports you to simpler times. Each bar carries with it the essence of family gatherings, summer picnics, and holiday feasts. They make for a symbol of love and togetherness, frequently passed around at potlucks and reunions. The vibrant cherry hue alone calls to you, promising a bite filled with joy, just like those days in grandma’s kitchen.
Why This Recipe Is a Family Favorite and Crowd-Pleaser
Old-Fashioned Cherry Bars have become a timeless family favorite not just for their wonderful taste, but also for the memories they invoke. From birthdays to holiday dinners, these bars have a way of bringing everyone together. Despite all the new and trendy desserts that catch our eye, there’s something captivating about sharing a simple treat that has stood the test of time.
The beauty of Old-Fashioned Cherry Bars lies in their versatility. Whether served warm with a scoop of vanilla ice cream or cooled to perfection with a sprinkle of powdered sugar, they please everyone. Friends and family alike cannot resist coming back for seconds, often requesting their own heaping slice when dessert rolls around. In essence, baking these bars feels like sharing a piece of familial history, a tradition that weaves its way through each new generation.
Ingredients and Preparation
Essential Ingredients and Possible Substitutions
To create the perfect batch of Old-Fashioned Cherry Bars, gather a few essential ingredients. Here’s what you’ll need:
- Cherries: Fresh or canned, pitted cherries are key. If using canned, ensure you drain them well to avoid excess moisture.
- Butter: Unsalted butter enhances the richness of the crust. Opt for high-quality butter to elevate the flavor.
- Sugar: Granulated sugar sweetens the cherry filling while also contributing to the crust’s sweetness.
- Flour: All-purpose flour forms the base of our crust and balances the filling.
- Eggs: These help bind the mixture, adding a lovely richness to the bars.
- Vanilla Extract: A splash of real vanilla adds warmth and depth to both the crust and the filling.
- Baking Powder: This helps give the bars a light fluffiness in texture.
If you’re in a pinch, there are substitutions available. For a twist, feel free to use frozen cherries instead of fresh; just make sure they’re thawed and well-drained. If you don’t have all-purpose flour on hand, a gluten-free flour blend works as a great alternative. Additionally, using a flavored extract such as almond can intensify the taste experience beautifully.
Step-by-Step Recipe Instructions with Tips
Let’s walk through the creation of these scrumptious Old-Fashioned Cherry Bars:
Step 1: Preheat the Oven
Begin by preheating your oven to 350°F (175°C). Prepare a 9×13 inch baking pan by greasing it lightly or lining it with parchment paper for easy removal.
Step 2: Prepare the Cherry Filling
In a mixing bowl, combine your cherries, ½ cup of sugar, and a tablespoon of flour. Gently stir until the cherries are coated. Set this aside while you make your crust.
Step 3: Make the Crust
In another mixing bowl, cream together 1 cup of softened butter and 1 cup of sugar until light and fluffy. This should take around 2-3 minutes. Add in the eggs, one at a time, mixing well after each addition. Stir in 1 teaspoon of vanilla extract.
Now, mix in the flour and baking powder until just combined. Be careful not to overmix; you want that tender texture!
Step 4: Assemble the Bars
Divide the dough in half. Press half of the mixture into the bottom of your prepared pan. This will serve as your base. Next, spread the cherry filling evenly over the crust. Crumble the remaining dough over the cherry layer, scattering it as evenly as you can.
Step 5: Bake
Bake in your preheated oven for 35-40 minutes, or until the top is golden brown and the filling is bubbling slightly. The wonderful aroma will fill your home, beckoning everyone to the kitchen.
Step 6: Cool and Serve
Once baked, allow the bars to cool in the pan for at least 20 minutes. For easier cutting, consider chilling them in the refrigerator for an additional 30 minutes. Cut into squares or rectangles, sprinkle with powdered sugar if desired, and serve!
Cooking Techniques and Tips
How to Cook Old-Fashioned Cherry Bars Perfectly
Cooking these Old-Fashioned Cherry Bars is quite forgiving, but a few techniques can ensure perfection. First, pay careful attention to your montaging of ingredients. Always cream the butter and sugar well; this aeration provides a lighter texture. Avoid overworking the dough, especially after adding flour, as this can lead to toughness.
Secondly, remember that the cherry filling is crucial. Ensure the cherries are adequately drained (if using canned) to keep the bars from becoming soggy. Lastly, for those golden brown edges, you can rotate your pan halfway through baking, as some ovens have hot spots that can brown unevenly.
Common Mistakes to Avoid
When preparing Old-Fashioned Cherry Bars, it’s easy to fall into a few common pitfalls. One of the biggest missteps is using cherries packed in syrup; their sweetness can alter the intended flavor. For the best results, opt for unsweetened or fresh cherries.
Another mistake is skipping the cooling step after baking. While it’s tempting to dive right in, allowing the bars to set will make a world of difference in the texture and flavor. Finally, ensure your baking soda or powder is fresh; expired leavening agents can hinder the rise and overall appeal.
Health Benefits and Serving Suggestions
Nutritional Value of Old-Fashioned Cherry Bars
While it’s important to indulge in dessert, Old-Fashioned Cherry Bars can also offer some nutritional benefits. Cherries, one of the primary ingredients, provide antioxidants which are known to combat inflammation and improve sleep quality. Paired with the energy from the sugars and carbohydrates in the crust, these bars can become a delightful treat that brings joy while providing a few health benefits.
Best Ways to Serve and Pair This Dish
Old-Fashioned Cherry Bars shine as a standalone dessert, but pair them with a scoop of vanilla bean ice cream or a dollop of freshly whipped cream for an elevated experience. For a fun twist, consider serving these bars with a drizzle of warm chocolate sauce or a sprinkle of chopped nuts for an added crunch.
They make an excellent dessert for any gathering, but they’re also wonderful coffee companions for a cozy afternoon. No matter how you serve them, these bars bring a sense of home and joy to any occasion.
FAQ Section
What type of cherries are best for Old-Fashioned Cherry Bars?
Fresh tart cherries, such as Montmorency, are ideal for Old-Fashioned Cherry Bars. If fresh cherries are out of season, high-quality canned cherries without added syrup also work well.
Can I use dried garlic instead of fresh?
In this instance, garlic is not an ingredient in Old-Fashioned Cherry Bars, so there’s no need to worry about fresh or dried options! Save garlic for your savory dishes!
How do I store leftover Old-Fashioned Cherry Bars?
Stored in an airtight container, leftover bars can be kept at room temperature for a couple of days. For longer-lasting freshness, refrigerate them for up to a week.
Can I freeze Old-Fashioned Cherry Bars?
Absolutely! Old-Fashioned Cherry Bars freeze wonderfully. Once cooled, cut them into squares and wrap them in plastic wrap or aluminum foil, then store them in a freezer-safe container. They’ll keep well for up to three months. Thaw in the refrigerator before enjoying again.
As I reflect on my love for Old-Fashioned Cherry Bars, I can’t help but smile at the warmth they bring to my family. If you’re like me and cherish recipes that hold a story, you’ll want to immerse yourself in the process of creating these bars. There’s something comfortable and lovely about sharing a taste of tradition, one delightful bite at a time. Trust me, you’ll want to make this again and again!
Print
Old-Fashioned Cherry Bars
- Total Time: 55 minutes
- Yield: 16 servings 1x
- Diet: Vegetarian
Description
Nostalgic Old-Fashioned Cherry Bars featuring a buttery crust and rich cherry filling, perfect for any gathering.
Ingredients
- 2 cups pitted cherries (fresh or canned)
- 1 cup unsalted butter, softened
- 1 ½ cups granulated sugar
- 2 cups all-purpose flour
- 2 large eggs
- 1 teaspoon vanilla extract
- 1 teaspoon baking powder
Instructions
- Preheat oven to 350°F (175°C) and grease a 9×13 inch baking pan.
- In a mixing bowl, combine cherries, ½ cup of sugar, and 1 tablespoon of flour; set aside.
- Cream together butter and 1 cup of sugar until fluffy. Add eggs one at a time, then stir in vanilla.
- Mix in flour and baking powder until just combined.
- Press half of the dough into the pan, spread with cherry filling, then crumble remaining dough on top.
- Bake for 35-40 minutes until golden brown and filling bubbles.
- Cool for at least 20 minutes before slicing and serving.
Notes
For a twist, use frozen cherries instead of fresh; ensure they are thawed and drained well. Serve warm with ice cream or chilled with powdered sugar.
- Prep Time: 15 minutes
- Cook Time: 40 minutes
- Category: Dessert
- Method: Baking
- Cuisine: American
Nutrition
- Serving Size: 1 bar
- Calories: 250
- Sugar: 15g
- Sodium: 150mg
- Fat: 10g
- Saturated Fat: 6g
- Unsaturated Fat: 4g
- Trans Fat: 0g
- Carbohydrates: 36g
- Fiber: 1g
- Protein: 3g
- Cholesterol: 40mg
Keywords: cherry bars, dessert, nostalgic, baking, family recipe