Growing up, Christmas was a magical time in my household, filled with the warmth of family, laughter, and, of course, my grandmother’s kitchen. I can still remember my first experience with Christmas Chocolate Caramel Cups. The snow gently blanketed our Asheville backyard, and the aroma of sweet chocolate mingled with the lingering scent of pine from our tree. As a child, I stood on a stool beside my grandmother, mesmerized by how she transformed simple ingredients into pure delight. She’d melt chocolate in a double boiler, the rich, dark liquid shimmering like liquid gold. Then, she would pour it into delicate paper cups, creating a perfect little shell for oozing caramel.
Watching the way her eyes lit up with every step, I realized that cooking was not just about the end product; it was about sharing joy, love, and traditions. Those moments blended fun and curiosity into a sweet, unforgettable memory that I carry with me. Each time I make Christmas Chocolate Caramel Cups now, I feel her spirit guiding my hands, enveloping my home in nostalgia and warmth, even as I’m creating something new.
These chocolate caramel cups are more than just treats; they are a celebration of the season, a nod to family, and a reminder that cooking is truly an expression of love. As we dive into the recipe together, I invite you to embrace this journey and make your own magical memories.
Flavor and Popularity
The Unique Flavor Profile of Christmas Chocolate Caramel Cups
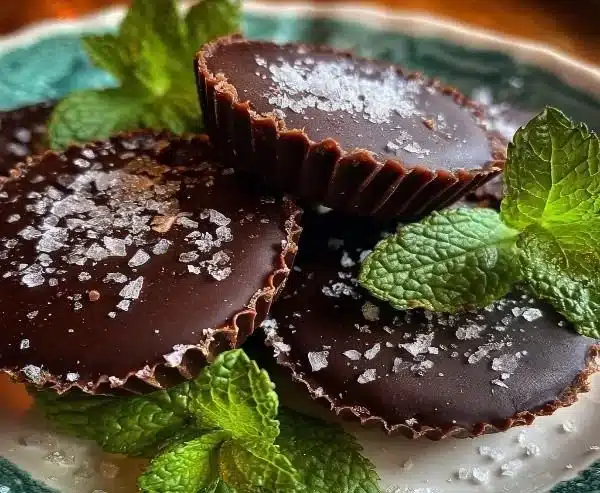
Imagine sinking your teeth into a luscious chocolate shell, followed by the buttery sweetness of caramel that dances across your taste buds. The Christmas Chocolate Caramel Cups boast a rich, deep chocolate flavor that’s perfectly complemented by the silky, slightly salty caramel within. The combination creates an indulgent treat that feels festive and decadent, perfect for holiday gatherings or cozy nights at home.
The beauty of these little delights lies in their simplicity and versatility. You can play with different types of chocolate—dark, milk, or even white—to create the perfect balance for your palate. Some folks even add a sprinkle of flaky sea salt on top, heightening the experience by introducing a delightful contrast between the sweetness of the caramel and the richness of the chocolate. And let’s not forget the potential for flavor variations; think peppermint essence for a minty twist or a hint of orange zest for a citrusy fresh note. The possibilities are as boundless as the joy they bring.
Why This Recipe Is a Family Favorite and Crowd-Pleaser
I can’t count the number of times I’ve brought these Christmas Chocolate Caramel Cups to holiday parties or family gatherings, and each time, they vanish in a flash. Everyone from young ones to seasoned sweet-tooths finds joy in these irresistible treats. Why? Because they’re little bites of happiness, evoking that nostalgic warmth we all crave during the festive season. What’s more, they are perfect for sharing; their bite-sized elegance makes them ideal for passing around at gatherings.
They also create a beautiful presentation when placed on a decorative platter, sparkling under the twinkling holiday lights. The joy of watching friends and family share in the delight of what you’ve created makes all the effort worthwhile. I can assure you; there’s nothing quite like the satisfied smiles and happy murmurs that come with every shared Christmas Chocolate Caramel Cup.
Ingredients and Preparation
Essential Ingredients and Possible Substitutions
To make indulgent Christmas Chocolate Caramel Cups, you’ll want to gather a few essential ingredients. Here’s what you need:
- Chocolate: Use high-quality chocolate chips—dark, milk, or a mixture of both for a delightful balance of flavors.
- Caramels: You can find pre-wrapped caramels or make your own if you’re feeling adventurous.
- Butter: Adding a touch of unsalted butter to the caramel enhances its richness.
- Cream: Heavy cream adds a smooth, luxurious texture to the caramel.
- Sea salt: For that perfect sweet-and-salty balance, a sprinkle of flaky sea salt will elevate your creation.
If you need substitutions, don’t worry! You can swap out chocolate chips for chocolate bars that you chop up yourself. For a vegan-friendly version, try using dairy-free chocolate and make or buy vegan caramel. And if you’re aiming for a lower sugar option, look for sugar-free candy alternatives available on the market.
Step-by-Step Recipe Instructions with Tips
Prepare Your Molds: Line a mini muffin tin with paper liners. This will serve as your mold for the chocolate cups.
Melt the Chocolate: In a double boiler, gently melt your chocolate. Stir until smooth, then remove from heat.
Coat the Molds: Use a spoon or a small brush to coat the inside of each liner with melted chocolate, making sure to create a thick layer.
Chill: Place the tin in the refrigerator for about 15 minutes or until the chocolate is set.
Make the Caramel: In a saucepan, combine chopped caramels and heavy cream over low heat. Stir until melted and smooth; remove from heat and add a pinch of salt.
Fill the Cups: Spoon caramel into the chocolate cups, leaving a little room at the top.
Seal with Chocolate: Reheat the remaining chocolate if necessary, then drizzle or spoon it over the filled caramel cups to seal the tops.
Final Chill: Return the cups to the fridge for about 30 minutes to harden fully.
Enjoy: Once set, peel away the liners and serve!
A little tip: If you’re in a hurry, consider using a microwave for melting the chocolate instead of a double boiler. Just be cautious not to burn it—heat in short intervals and stir frequently.
Cooking Techniques and Tips
How to Cook Christmas Chocolate Caramel Cups Perfectly
Creating these Christmas Chocolate Caramel Cups is about patience and attention to detail. One of the keys to perfection is temperature control. Melting chocolate too quickly can result in a grainy texture, while overcooking the caramel can lead to a hard candy instead of that silky goodness we desire.
Another essential tip is consistency in the chocolate coating. A thin layer might crack and lead to leaks, while a thick coating could overpower the caramel’s flavor. Aim for a happy medium that allows the chocolate to hold its shape while still offering a delightful snap.
Common Mistakes to Avoid
It’s easy to make mistakes when you’re eager to indulge in these sweet treats. Here are a few pitfalls to avoid:
Skipping Cooling Steps: Don’t rush the chilling process. Leaving the chocolate and caramel to set fully ensures you have a perfect consistency.
Forgetting Salt: While sea salt is optional, it plays a crucial role in enhancing the flavor. Skip it at your peril!
Overfilling: When adding caramel to the cups, leave a little space at the top. This prevents overflow during the sealing process.
Using Low-Quality Ingredients: The quality of your chocolate and caramel will greatly influence the final taste. Invest in good ingredients for the best results.
Health Benefits and Serving Suggestions
Nutritional Value of Christmas Chocolate Caramel Cups
While Christmas Chocolate Caramel Cups are certainly a treat, they do offer some nutritional benefits as well. Dark chocolate contains antioxidants and may improve heart health when consumed in moderation. Caramels, while high in sugar, can provide quick bursts of energy if enjoyed as an occasional treat.
If you’re concerned about calorie intake, consider adjusting your portion size or even making smaller cups. By embracing moderation, you can enjoy the sweet memories these cups evoke without the guilt.
Best Ways to Serve and Pair This Dish
These chocolate caramel cups shine as festive treats on their own, but they can also be paired with a variety of flavors. Consider serving them alongside a warm cup of spiced chai or coffee for a comforting, indulgent experience.
For an extra festive touch, arrange them on a beautiful holiday platter with some fresh fruit, nuts, or even a selection of seasonal cookies. They also make thoughtful gifts—packaged in a decorative box, they carry the essence of homemade love.
FAQ Section
What type of mushrooms are best for Christmas Chocolate Caramel Cups?
While mushrooms don’t typically belong in this recipe, if you’re cooking a savory dish alongside your treats, consider earthy varieties like shiitake or button mushrooms for added depth.
Can I use dried garlic instead of fresh?
In the context of our Christmas Chocolate Caramel Cups, garlic is not an ingredient. However, if you’re using it in a savory recipe served alongside, dried garlic works, but fresh garlic will yield more flavor and depth.
How do I store leftover Christmas Chocolate Caramel Cups?
Store the cups in an airtight container at room temperature or in the refrigerator for up to a week. Just make sure to separate layers with parchment paper to prevent sticking.
Can I freeze Christmas Chocolate Caramel Cups?
Yes! You can freeze these treats for longer preservation. Just ensure they are well-wrapped in plastic wrap and then placed in an airtight container. They can last up to three months in the freezer. Allow them to thaw at room temperature before enjoying.
Conclusion
If you’re like me, the holiday season is all about bringing joy to those around you through food, and there’s something comforting about sharing treats that carry stories and memories. Christmas Chocolate Caramel Cups are an inviting way to celebrate this spirit, wrapping together warmth and tradition in little bites of happiness.
Trust me, you’ll want to make these again and again, filling your home with enchanting aromas and the delight of loved ones gathered around. So, roll up your sleeves, gather those ingredients, and let’s create something special together this holiday season!
Print
Christmas Chocolate Caramel Cups
- Total Time: 45 minutes
- Yield: 24 servings 1x
- Diet: Vegetarian
Description
Indulgent chocolate cups filled with rich caramel, perfect for holiday gatherings.
Ingredients
- 1 cup high-quality chocolate chips (dark, milk, or a mixture)
- 18 caramel candies, chopped
- 2 tablespoons unsalted butter
- 1/2 cup heavy cream
- Flaky sea salt for topping (optional)
Instructions
- Prepare Your Molds: Line a mini muffin tin with paper liners.
- Melt the Chocolate: In a double boiler, gently melt your chocolate. Stir until smooth, then remove from heat.
- Coat the Molds: Use a spoon or a small brush to coat the inside of each liner with melted chocolate.
- Chill: Place the tin in the refrigerator for about 15 minutes or until the chocolate is set.
- Make the Caramel: In a saucepan, combine chopped caramels and heavy cream over low heat. Stir until melted and smooth; remove from heat and add a pinch of salt.
- Fill the Cups: Spoon caramel into the chocolate cups, leaving a little room at the top.
- Seal with Chocolate: Drizzle or spoon remaining chocolate over the filled caramel cups to seal the tops.
- Final Chill: Return the cups to the fridge for about 30 minutes to harden fully.
- Enjoy: Once set, peel away the liners and serve!
Notes
For variations, consider adding peppermint essence or orange zest for new flavor twists.
- Prep Time: 15 minutes
- Cook Time: 30 minutes
- Category: Dessert
- Method: Chilling
- Cuisine: American
Nutrition
- Serving Size: 1 cup
- Calories: 150
- Sugar: 20g
- Sodium: 50mg
- Fat: 7g
- Saturated Fat: 4g
- Unsaturated Fat: 2g
- Trans Fat: 0g
- Carbohydrates: 20g
- Fiber: 1g
- Protein: 1g
- Cholesterol: 15mg
Keywords: chocolate, caramel, holiday desserts, Christmas treats, easy recipes