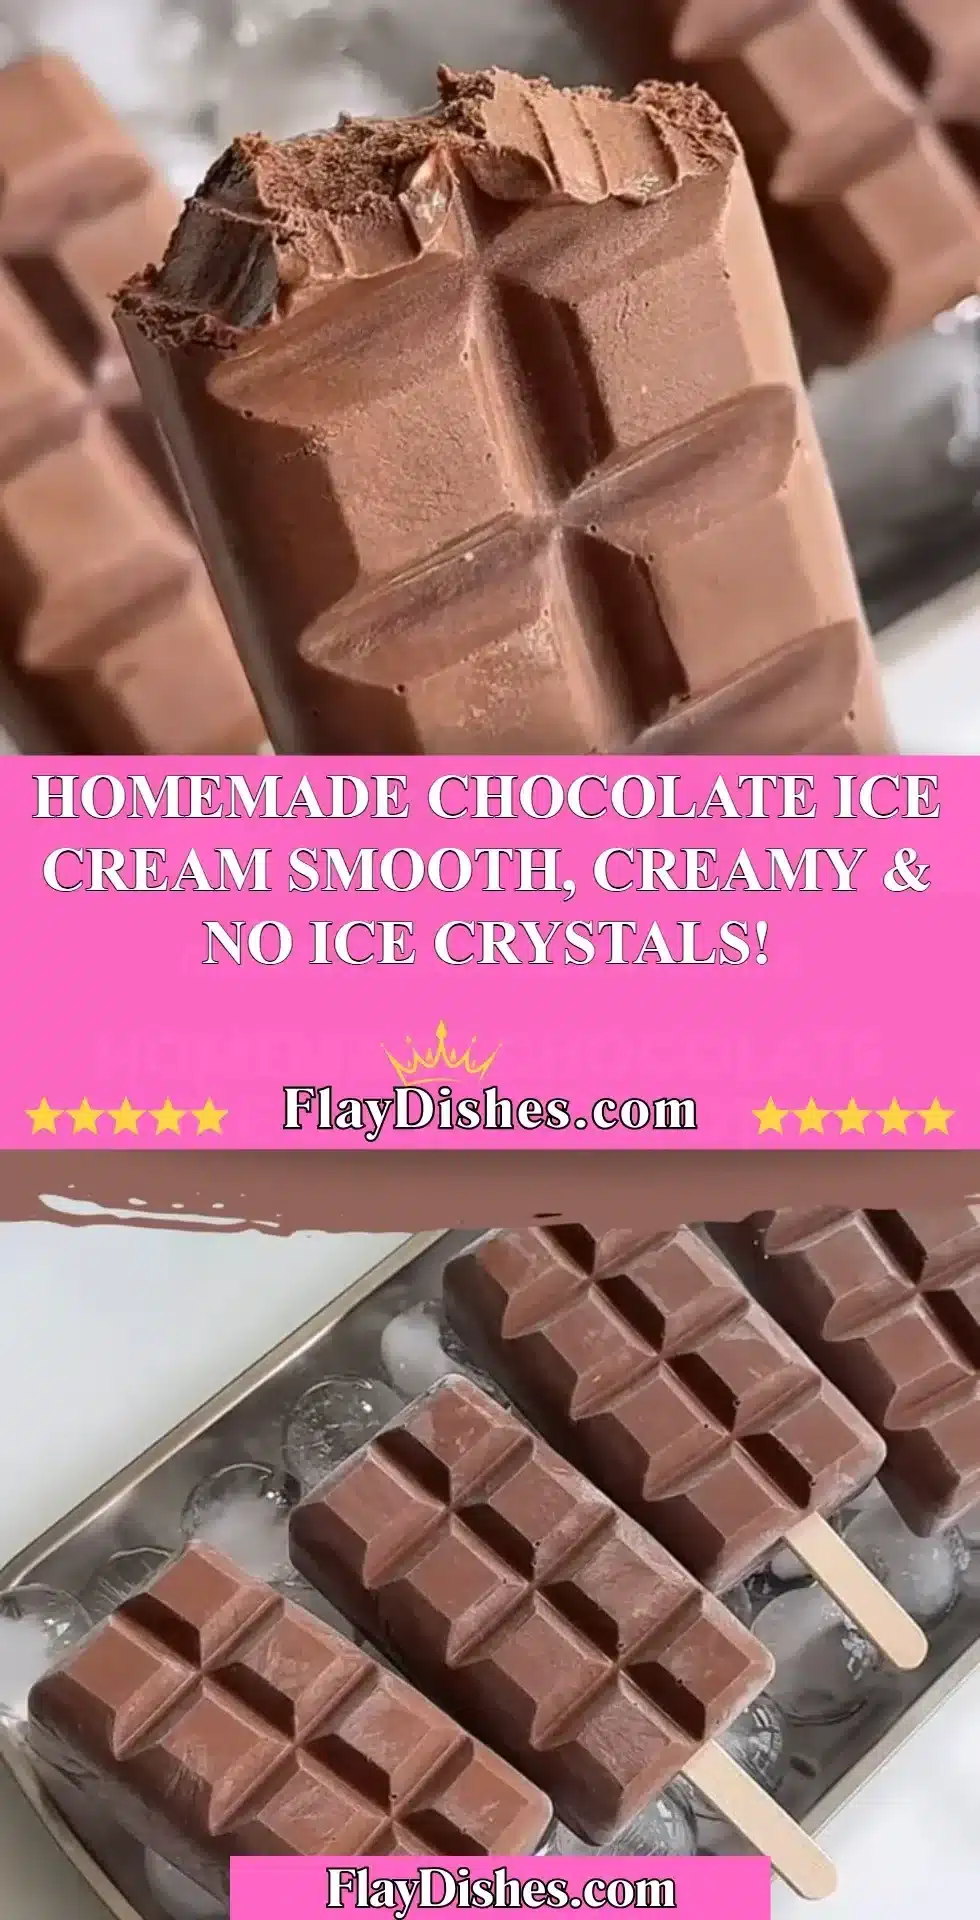
When I think about summer afternoons spent in my kitchen, one particular memory always bubbles to the surface. It was a sultry day in Asheville when I decided it was time to create something my grandmother would surely have approved of: Homemade Chocolate Ice Cream smooth, creamy & no ice crystals! The aroma of rich cocoa wafted through the air, igniting a sense of nostalgia that warmed my heart. Back then, I was just a young girl observing my grandmother as she blended together her favorite ingredients with love. It’s funny how one simple recipe can paint a canvas of memories.
The joy of that day came from more than just the ice cream; it was the laughter shared with family, the sound of spoons clinking against bowls, and the delight on everyone’s faces. I remember impatiently waiting for that magic moment when I could scoop out a serving, eager to taste the velvety goodness I had crafted. To my delight, the end result was exactly what I hoped for—ice cream that was dreamily smooth, decadently creamy, and without a single ice crystal in sight. Each spoonful was a reminder that cooking is not just about feeding the body; it’s about nourishing the soul. Today, I’d love to share my beloved recipe with you, so you too can create moments filled with joy and memories.
Flavor and Popularity
The Unique Flavor Profile of Homemade Chocolate Ice Cream Smooth, Creamy & No Ice Crystals!
The enchanting taste of homemade chocolate ice cream comes from the perfect blend of rich cocoa and velvety cream. Each bite offers a delightful balance of sweetness and a touch of bitterness from the cocoa powder, reminiscent of the chocolate treats enjoyed during childhood. As the ice cream melts on your tongue, you’ll experience the lush sensation that only comes from using high-quality ingredients.
The natural creaminess is further enhanced by the use of egg yolks, which not only enrich the flavor but create a luxurious texture that commercial varieties simply can’t match. The beauty of making this dessert at home is that you have complete control over the flavor—feel free to add a hint of vanilla or a dash of espresso to elevate the chocolate.
Why This Recipe Is a Family Favorite and Crowd-Pleaser
What sets my homemade chocolate ice cream apart is not just its smoothness, but the love that goes into preparing it. Over the years, I’ve made this treat for family gatherings, birthday celebrations, and even some quiet evenings at home. Each time, it has been a showstopper—a dish that draws everyone together.
There’s something special about serving homemade ice cream to loved ones; it brings a smile to their faces and stirs up cherished memories. Friends often ask for the recipe, and I proudly share it, knowing it will help them create their own joyful moments. It’s a delightful reminder that food has the power to connect us, to bring laughter to our gatherings, and to encourage us to savor the simple pleasures of life.
Ingredients and Preparation
Essential Ingredients and Possible Substitutions
To whip up this delicious homemade chocolate ice cream, here’s a list of essential ingredients you’ll need:
- Cocoa Powder: Opt for a quality unsweetened cocoa powder to get that deep chocolate flavor. If you don’t have cocoa powder, Dutch-processed cocoa can work well, adding a smoother touch.
- Heavy Cream: The cream forms the basis of your ice cream, giving it that rich and decadent texture. For a lighter version, try substituting half with whole milk.
- Milk: Whole milk enhances the creaminess of your ice cream. If you prefer a non-dairy version, almond or coconut milk can provide delicious results, though the texture may vary slightly.
- Egg Yolks: These help to create a custard-like base that minimizes ice crystals. If you need an egg-free recipe, consider using a cornstarch slurry, which can thicken the mixture without eggs.
- Sugar: Granulated sugar sweetens the ice cream and helps to lower the freezing point, contributing to that smooth texture. You can explore alternatives like honey or agave syrup for a different flavor.
- Salt: A pinch enhances the overall sweetness of the chocolate.
- Vanilla Extract: While optional, vanilla adds a wonderful depth to the overall flavor.
Step-by-Step Recipe Instructions with Tips
Step 1: Create the Base
Start by whisking together the cocoa powder, milk, and sugar in a saucepan over medium heat. Stir until the mixture is smooth and starts to warm.
Step 2: Temper the Egg Yolks
In a separate bowl, whisk your egg yolks. Once your cocoa mixture is warm—be careful not to let it boil—slowly pour it into the egg yolks, stirring constantly. This process, called tempering, prevents the yolks from curdling.
Step 3: Cook the Mixture
Return the tempered mixture to the saucepan and cook over medium heat. Stir continuously until it thickens slightly, enough to coat the back of a spoon. This typically takes about 5-7 minutes.
Step 4: Add Cream and Flavorings
Once thickened, remove it from the heat. Stir in the heavy cream, a pinch of salt, and vanilla extract. Let it chill in the refrigerator for at least 2 hours; overnight is even better!
Step 5: Churn Away
Pour your chilled mixture into an ice cream maker and churn according to the manufacturer’s instructions. If you don’t have an ice cream maker, you can place the mixture in a shallow dish and stir every 30 minutes as it freezes to help break up any ice crystals.
Step 6: Freeze and Enjoy
Transfer the churned ice cream into an airtight container and freeze for at least 4 hours before serving. When ready to serve, let it sit at room temperature for a few minutes for easier scooping.
Cooking Techniques and Tips
How to Cook Homemade Chocolate Ice Cream Smooth, Creamy & No Ice Crystals! Perfectly
Creating the perfect ice cream hinges on a few key techniques. Ensuring your base mixture doesn’t boil is crucial, as high heat can lead to curdled eggs. When you store your ice cream, an airtight container is your best bet for avoiding ice crystals. Consider placing a piece of parchment paper directly on the surface of the ice cream before sealing to minimize air exposure.
Also, remember that churning is vital! This process aerates the mixture while keeping it smooth. Aim for a consistency that’s like soft serve before freezing for the best results.
Common Mistakes to Avoid
One of the biggest blunders to avoid is not chilling your mixture long enough. Skipping the refrigeration step could result in icy or grainy ice cream. Likewise, rushing the egg tempering process can lead to scrambled eggs—nobody wants that in their ice cream!
Be patient during churning; under-churning will yield a less creamy texture. Lastly, try not to skip the salt! It really adds a nuance to the sweetness, enhancing the overall flavor profile.
Health Benefits and Serving Suggestions
Nutritional Value of Homemade Chocolate Ice Cream Smooth, Creamy & No Ice Crystals!
While it may be a dessert, this homemade chocolate ice cream provides some nutritional benefits! The dairy adds calcium and protein, while cocoa is rich in antioxidants. Though still indulgent, making it at home allows you to control the sugar and fat content, making it a slightly healthier treat compared to store-bought varieties.
Best Ways to Serve and Pair This Dish
There are countless ways to enjoy homemade chocolate ice cream! Serve it in a sugar cone, alongside a slice of homemade chocolate cake, or simply in a bowl with a drizzle of hot fudge for an extra sweet touch. You can also add toppings such as sprinkles, crushed nuts, or fresh berries to enhance your experience.
For a lovely pairing, consider serving it with a shot of espresso. The rich flavors complement each other beautifully, making it an elegant dessert option.
FAQ Section
What type of mushrooms are best for Homemade Chocolate Ice Cream Smooth, Creamy & No Ice Crystals!?
You might be surprised, but mushrooms aren’t typically used in chocolate ice cream! However, if you’re interested in adding earthy flavors, shiitake or portobello can be roasted and pureed to enhance the chocolate if you’re feeling adventurous. Just remember, this isn’t a common ingredient for ice cream!
Can I use dried garlic instead of fresh?
When it comes to sweet desserts like ice cream, garlic isn’t a conventional ingredient. However, if you’re looking for a different flavor with authenticity, consider using a hint of garlic-infused oil in savory recipes instead.
How do I store leftover Homemade Chocolate Ice Cream Smooth, Creamy & No Ice Crystals!?
Store any leftover ice cream in an airtight container in the freezer. To prevent ice crystals from forming, press a piece of wax paper directly onto the surface before sealing it. It should be good for about two weeks, but trust me, it likely won’t last that long!
Can I freeze Homemade Chocolate Ice Cream Smooth, Creamy & No Ice Crystals!?
Of course! Freezing is essential to creating the perfect ice cream texture. Just be sure to follow proper storage methods to maintain that smooth, creamy quality when you’re ready to enjoy it again.
Conclusion
If you’re like me, there’s nothing quite like the taste of homemade ice cream made from scratch, especially on a hot summer day. The process of creating homemade chocolate ice cream smooth, creamy & no ice crystals! becomes a journey filled with joy, laughter, and delicious flavors. Trust me, you’ll want to make this again and again. Not just for yourself, but to share with those you love. Cooking is a beautiful way to express care and create memories. So why not bring a little magic into your kitchen today?
Print
Homemade Chocolate Ice Cream
- Total Time: 240 minutes
- Yield: 6 servings 1x
- Diet: Vegetarian
Description
A rich and creamy homemade chocolate ice cream recipe, smooth and without ice crystals, perfect for summer afternoons.
Ingredients
- 1 cup unsweetened cocoa powder
- 2 cups heavy cream
- 1 cup whole milk
- 4 egg yolks
- 1 cup granulated sugar
- 1/4 teaspoon salt
- 1 teaspoon vanilla extract (optional)
Instructions
- Whisk together cocoa powder, milk, and sugar in a saucepan over medium heat until smooth and warm.
- In a separate bowl, whisk the egg yolks, then slowly pour the warm cocoa mixture into the yolks while stirring to temper them.
- Return the tempered mixture to the saucepan and cook over medium heat, stirring continuously until it thickens, about 5-7 minutes.
- Remove from heat, add heavy cream, salt, and vanilla extract, and chill in the refrigerator for at least 2 hours.
- Churn the chilled mixture in an ice cream maker according to the manufacturer’s instructions.
- Transfer to an airtight container and freeze for at least 4 hours before serving.
- Let the ice cream sit out for a few minutes at room temperature for easier scooping before serving.
Notes
For a lighter version, substitute half of the cream with whole milk. If you prefer non-dairy, consider using almond or coconut milk.
- Prep Time: 20 minutes
- Cook Time: 10 minutes
- Category: Dessert
- Method: Churning
- Cuisine: American
Nutrition
- Serving Size: 1 cup
- Calories: 250
- Sugar: 22g
- Sodium: 50mg
- Fat: 17g
- Saturated Fat: 10g
- Unsaturated Fat: 5g
- Trans Fat: 0g
- Carbohydrates: 30g
- Fiber: 3g
- Protein: 5g
- Cholesterol: 100mg
Keywords: chocolate ice cream, homemade ice cream, summer dessert, creamy ice cream