Every year, as October rolls around, my heart begins to dance with memories of baking our family’s beloved Chocolate Cake with Halloween Decoration. I still vividly recall one chilly October evening when my granddaughter, Lily, and I decided to whip up something special. The air was bursting with a mix of sweet anticipation and pumpkin spice, while dark clouds rolled in, setting the perfect mood for a little Halloween magic.
As we cracked open the cocoa powder, its rich aroma enveloped the kitchen, evoking warm memories of my own childhood spent in my grandmother’s cozy kitchen. She would teach me that the secret to a delightful chocolate cake lies not just in the ingredients but in the love poured into each step. With flour dusting our noses and giggles filling the air, we carefully folded the batter, dreaming of colorful decorations that would transform our creation into a festive centerpiece. We jumped at the chance to craft spooky ghosts out of meringue, eerie chocolate spiders, and some green-and-orange sprinkles that made our cake feel alive!
Baking that Chocolate Cake with Halloween Decoration wasn’t just about making dessert; it was about creating memories. Those moments shared are the ones that linger, binding generations with laughter, love, and yes—delicious chocolate!
As autumn settles into our lives, let’s dive into the delicious, spooky world of Halloween-themed chocolate cake! Whether you’re hunting for the perfect treat for a Halloween gathering or planning a fun family activity, this cake is bound to delight everyone who lays eyes on it.
Flavor and Popularity
The Unique Flavor Profile of Chocolate Cake with Halloween Decoration
When you think of chocolate cake, the first words that often spring to mind are rich, moist, and decadent. The beauty of a Chocolate Cake with Halloween Decoration is that it doesn’t just satisfy your sweet tooth; it transforms a classic dessert into a celebration. Imagine taking a bite, and the velvety chocolate melting in your mouth, accompanied by hints of vanilla and a touch of vibrant fall spices like cinnamon and nutmeg.
What truly sets this cake apart are the unique decorations that play into the Halloween spirit. The earthy tones of dark chocolate paired with vibrant hues from candies and icing create a visual feast. The flavors harmonize, offering a symphony of sweetness with underlying depth, thanks to the buttery richness of the cake and the playful crunch of decorations.
Why This Recipe Is a Family Favorite and Crowd-Pleaser
Chocolate cake has always been a classic in our home, but when adorned with Halloween decorations, it takes on a life of its own. It’s not simply another dessert; it’s a spectacle that everyone anticipates. Families and friends gather around the table, their excitement palpable as they spot the cake. Kids squeal with delight over chocolate-covered marshmallows shaped like ghosts, while the adults reminisce about their own childhood celebrations.
The combination of nostalgia and flavor brings us together in a way that only food can. Each slice of this Chocolate Cake with Halloween Decoration is filled with laughter, smiles, and good company, making it a staple for our holiday traditions.
Ingredients and Preparation
Essential Ingredients and Possible Substitutions
To make a delicious Chocolate Cake with Halloween Decoration, you’ll need to gather the following ingredients:
- All-purpose flour: A must-have for that fluffy texture. If you’re gluten-sensitive, consider using almond or oat flour for a delightful alternative.
- Cocoa powder: The star ingredient! Opt for unsweetened for the best results. If you want a twist, try adding a touch of dark chocolate cocoa.
- Baking powder and baking soda: These leavening agents ensure your cake rises to perfection. You can also use self-rising flour as a substitute.
- Sugar: Granulated sugar is traditional, but you can switch it up with brown sugar for a hint of caramel flavor.
- Eggs: They provide richness and help bind the ingredients. For a vegan version, use flax eggs made with ground flaxseed and water.
- Butter: Use unsalted butter for a rich taste. In a pinch, vegetable oil works well, too.
- Milk: Whole or buttermilk gives moisture. Almond or oat milk can be a lovely dairy-free option.
- Vanilla extract: This adds depth to the flavor. If you’re feeling adventurous, try almond extract for a unique twist.
Now, if you find yourself low on some ingredients, don’t fret! You can substitute buttermilk with regular milk mixed with a dash of vinegar or lemon juice. Plus, you can use additional cocoa powder to enhance the chocolate flavor without compromising the cake’s integrity.
Step-by-Step Recipe Instructions with Tips
Step 1: Preheat Your Oven
Start by preheating your oven to 350°F (175°C). This allows your cake to rise beautifully while you combine the ingredients.
Step 2: Prepare Your Pans
Grease and flour two 9-inch round cake pans. You can also line the bottom with parchment paper for easy removal.
Step 3: Mix the Dry Ingredients
In a bowl, whisk together the flour, cocoa powder, baking powder, baking soda, and salt. This ensures an even distribution of leavening agents.
Step 4: Cream Butter and Sugar
In a separate bowl, beat the softened butter with sugar until light and fluffy—about 4-5 minutes. This step creates a tender cake structure.
Step 5: Add Eggs and Vanilla
Add the eggs one at a time, mixing well after each addition. Then, stir in the vanilla extract.
Step 6: Alternate Dry and Wet Ingredients
Gradually mix in the dry ingredients with the milk, beginning and ending with the dry. Mix only until combined; overmixing can lead to a dense cake.
Step 7: Bake
Divide the batter evenly between the prepared pans and bake for 30-35 minutes or until a toothpick inserted in the center comes out clean.
Step 8: Cool and Frost
Once baked, allow the cakes to cool in the pans for about 10 minutes before transferring to a wire rack to cool completely. Frost the cake with your favorite chocolate frosting, then unleash your creativity with Halloween decorations!
Tips for a Spooky Presentation:
- Use black and orange sprinkles to dust the top.
- Create spiders using chocolate-covered pretzel sticks and candy eyes.
- Pipe fluffy ghost shapes with whipped cream or meringue.
- Place gummy worms crawling out from the cake for an eerie touch.
Cooking Techniques and Tips
How to Cook Chocolate Cake with Halloween Decoration Perfectly
Creating the perfect Chocolate Cake with Halloween Decoration involves patience and some tried-and-true baking techniques. Always make sure to measure your ingredients accurately and keep your oven temperature consistent. Trust the toothpick test—if it comes out clean, your cake is done!
When it comes to frosting, use a spatula or piping bag to achieve that beautiful finish. If you’re using fondant for intricate decorations, ensure your frosting layer isn’t too thick, or the fondant won’t adhere properly.
Common Mistakes to Avoid
Avoid these common pitfalls to ensure your cake turns out perfectly delightful:
- Overmixing the batter: This can lead to a tough texture. Mix just until combined!
- Not preheating the oven: Ensure your oven is ready before you put in your cake. This helps it rise properly.
- Skipping the cooling process: Trying to frost a warm cake can lead to a melted mess. Always allow the cake to cool completely.
Health Benefits and Serving Suggestions
Nutritional Value of Chocolate Cake with Halloween Decoration
While this cake is certainly a treat, it does have its moments of indulgence! Here’s a brief overview of what you’re savoring in each slice:
- Calories: Depending on the ingredients, a slice can range in calories, but it’s a gooey delight that sparks joy.
- Iron: Cocoa is rich in iron, providing a small boost to your dietary intake.
- Mood Boost: Chocolate is known for its mood-enhancing qualities—perfect for festive gatherings that celebrate togetherness.
Best Ways to Serve and Pair This Dish
Serve your Chocolate Cake with Halloween Decoration alongside a scoop of vanilla ice cream or whipped cream for a delightful contrast. You can also pair it with a steaming cup of pumpkin spice latte for that extra seasonal touch.
Consider placing your cake on a spooky-themed platter surrounded by mini pumpkins or scattered candy corn for a charming presentation.
FAQ Section
What type of mushrooms are best for Chocolate Cake with Halloween Decoration?
While mushrooms are an unexpected twist in a chocolate cake, you won’t be using them in this recipe! Instead, stick to sweet decorations for that festive Halloween flair.
Can I use dried garlic instead of fresh?
In this case, dried garlic is not recommended. Fresh garlic adds depth to savory dishes but wouldn’t complement the sweet flavors of your chocolate cake.
How do I store leftover Chocolate Cake with Halloween Decoration?
Store any leftovers in an airtight container at room temperature for up to three days. If you need longer storage, refrigerate it, but let it sit at room temperature for about 30 minutes before serving for the best texture.
Can I freeze Chocolate Cake with Halloween Decoration?
Absolutely! You can freeze the cake before decorating. Wrap it tightly in plastic wrap and store it in the freezer for up to three months. Thaw in the refrigerator before frosting, and you’ll have a cake ready for future celebrations.
Conclusion
If you’re like me, baking Chocolate Cake with Halloween Decoration will become a cherished tradition in your home. There’s something comforting about the familiarity of chocolate paired with the whimsical charm of Halloween. Trust me, you’ll want to make this again and again—not only for its scrumptious taste but for the memories you’ll create along the way. So gather your loved ones, let the laughter fill your kitchen, and whip up a cake that brings joy, one delicious slice at a time! Happy baking!
Print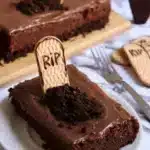
Chocolate Cake with Halloween Decoration
- Total Time: 50 minutes
- Yield: 12 servings 1x
- Diet: Vegetarian
Description
A delightful chocolate cake adorned with spooky Halloween decorations, perfect for family gatherings and celebrations.
Ingredients
- 2 cups all-purpose flour
- 3/4 cup unsweetened cocoa powder
- 1 1/2 tsp baking powder
- 1 1/2 tsp baking soda
- 1/2 tsp salt
- 1 1/2 cups granulated sugar
- 1/2 cup unsalted butter, softened
- 3 large eggs
- 1 tsp vanilla extract
- 1 cup whole milk
- 1 cup Halloween-themed decorations (sprinkles, chocolate spiders, marshmallow ghosts)
Instructions
- Preheat your oven to 350°F (175°C).
- Grease and flour two 9-inch round cake pans.
- In a bowl, whisk together flour, cocoa powder, baking powder, baking soda, and salt.
- In a separate bowl, beat the softened butter with sugar until light and fluffy.
- Add the eggs one at a time, mixing well after each addition, then stir in the vanilla.
- Gradually mix in the dry ingredients with the milk, starting and ending with the dry ingredients.
- Divide the batter between the pans and bake for 30-35 minutes.
- Allow the cakes to cool in the pans for 10 minutes before transferring to a wire rack to cool completely.
- Frost with chocolate frosting and decorate with Halloween-themed items.
Notes
For a vegan option, substitute eggs with flax eggs and use almond milk.
- Prep Time: 15 minutes
- Cook Time: 35 minutes
- Category: Dessert
- Method: Baking
- Cuisine: American
Nutrition
- Serving Size: 1 slice
- Calories: 350
- Sugar: 20g
- Sodium: 400mg
- Fat: 15g
- Saturated Fat: 6g
- Unsaturated Fat: 8g
- Trans Fat: 0g
- Carbohydrates: 46g
- Fiber: 2g
- Protein: 5g
- Cholesterol: 50mg
Keywords: chocolate cake, Halloween cake, Halloween dessert, baking, family recipe, chocolate frosting